This is the third part of a three-part post where I provide an in-depth look at the entire behind-the-scenes process of making a photo, showing exactly, step-by-step, all the way from start to finish, how I created this shot you see below (depending on which device and/or browser you are using, you may be able to move your cursor over the image to compare it with the original, unedited version). Part I discussed the pre-production: goals, subject matter, choosing the model and props, dealing with the limitations of the location, choice of lens and composition, and lighting set-up. If you haven’t read Part I yet, you can check it out here. Part II covers production: “chimping” my way through the shoot itself, adjusting pose, expression, composition, lighting, and exposure, and the in-camera editing process of picking the “hero” shot. This final installment will talk about the post-production: RAW conversion, clean-up and correction, stylizing through the use of various filters, and more. So let’s get to it.

POST-PRODUCTION:
First of all, please note that I’m going to assume that if you’re reading this, that you already have at least some familiarity with photo editing software. However, even if you’re a newbie, I’m sure that you will still be able to learn from the post, but it may involve stopping now and then to do a web search for a term that I’m using. Ok, moving on.
There are, of course, many excellent programs out there for editing photos, but I use Adobe almost exclusively, so that’s what I’m going to refer to in this post. However, most serious editing programs have comparable tools that might be named a bit differently, but do basically the same thing. To edit this photo, I used Adobe Photoshop RAW to do the RAW conversions for this shot, and Adobe Photoshop CS3 for everything else. These days, Adobe Lightroom has pretty much eliminated the need to use Photoshop for shots that don’t require any local adjustments or specific effects, and Lightroom blows Photoshop away when it comes to making quick global adjustments to a big batch of photos. However, if I’m focusing just on one image, I’ll usually start off with Lightroom for the RAW conversion (including many global adjustments that I used to use Photoshop for), and then switch to Photoshop. Lightroom is awesome and has totally changed the way I work for the better, but right now it pales in comparison to Photoshop when you want to do local adjustments and/or some major effects on one shot.
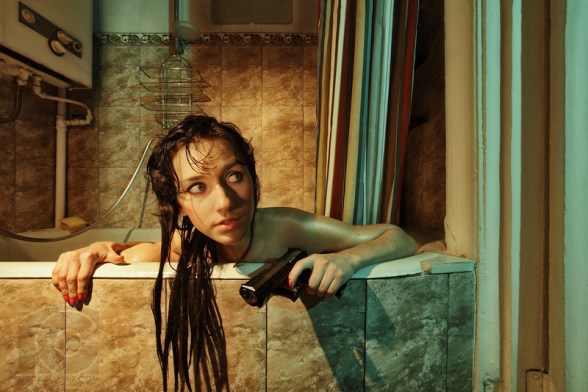
Here, again, is the unedited jpg from the shot I selected for the final version:

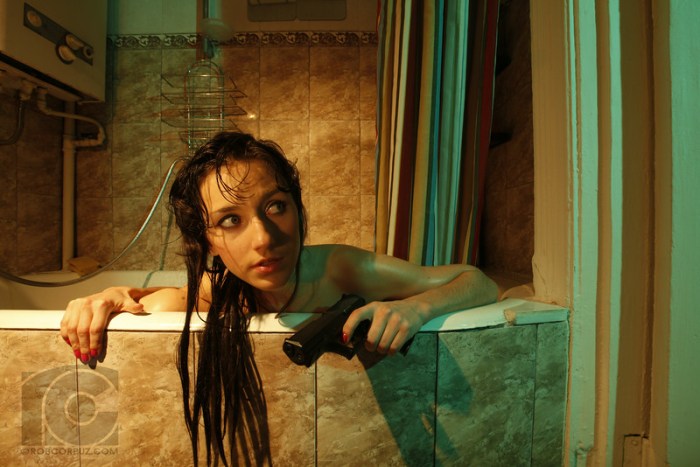
In this case, I knew I wouldn’t be using the jpeg at all, instead opting to use the RAW file for editing. This is a straight conversion of the original RAW file, with minimal adjustments:
")
At this point, the differences are pretty minimal, but we’re just getting started. While I’ve done lots of editing directly on out-of-camera jpegs, often this was because the old computer I had access to at the time simply didn’t have enough processing power to handle the increased file sizes and bit rates of RAW files without taking two or three times as long. Still, even then, for any serious work I’ve always tried to start with the RAW file, mainly for two reasons:
First, by editing the RAW file rather than a jpeg, you have increased leeway to tweak your dynamic range (up to about a stop of light in either direction) without damaging the image. While it is always, always better to get your exposure as you want it while you’re actually taking the photo, there are times when this isn’t a viable option. For example, in a low-light situation with a moving subject, the “correct” exposure suggested by the camera might leave you with a shutter speed that is too slow to get a sharp image. You’ve already set your aperture wide open, the ISO setting is as high as you’re willing to set it (for fear of creating too much noise), and a tripod is not an option. It this case, it’s a good idea to intentionally underexpose. In my opinion, unless you’re using blur for creative effect, a sharp, noisy, underexposed image nearly always beats a “properly” exposed but blurry one.
Or perhaps the dynamic range of what you’re trying to shoot is simply too big for the camera’s sensor to capture, external lighting is not an option, and you have to make a compromise and expose for either the highlights or the shadows. And sometimes, of course, you just get it wrong. I know I’ve certainly been guilty of this many, many times, but even the best photographers can’t get the exposure right on every shot. In any case, the added dynamic-range flexibility offered by RAW, while far from full-proof, can help a great deal with rescuing an image where the exposure isn’t what you want. In this particular case, none of the above issues was really a factor. I simply wanted to have as much control as possible of the tonal levels of different areas of the photo.
Second, barring issues resulting from having two or more different colored light sources, editing the RAW file allows you to tweak the white balance exactly how you want it, either by using the white balance tool (assuming you’ve got at least one part of your photo that is a neutral grey point) or by adjusting the kelvin sliders. In this case, I used two different colors on my lights intentionally for creative effect, so this wasn’t as much of a factor (although it did create some problems for me later, as you’ll see). If I remember correctly, I may have turned down the oranges very slightly and given the greens a slight bump, but it’s barely visible when you compare the two, because the overall white balance was already pretty much what I wanted out of the camera.
Next, I made a RAW conversion that was intentionally underexposed:
")
I did this mainly so I could use it to cover areas of the flat file that were overexposed, like the camera-left rim of the tub, but also to use some of the areas to add more contrast to the shadows without having to stretch the tone curve of the flat file too much.
Here is the third RAW conversion, which, as you probably guessed, is intentionally overexposed:
")
I made this so I could have the option of pulling detail out of the shadows, again without pushing the limits of the tone curve, and ending up with a lot of noise or banding, which can be a big problem, particularly when trying to do tonal adjustments on 8-bit jpegs.
Next, I merged the three RAW conversions together using Photoshop layer masks. There are entire books written just about layers and masking, so obviously explaining that topic is beyond the scope of this post, but I’ll try to give an extremely simplified and abridged description of the process I used:
1) I opened all three RAW conversions in one photoshop document, using the standard conversion as my base layer.
2) I added masks to both the underexposed and overexposed layers, and filled the masks with black, which completely hides the visibility of the layer.
3) Then, using brushes of varying opacities and sizes, I painted white back into the layer mask, revealing the parts of each layer that I wanted visible. You could, of course, also fill the layer with white and use a black brush to block parts of the layer, if it will work better with that particular image.
4) After that, I created a new layer set to the “Soft Light” blend mode and used a soft, low-opacity brush to paint over areas I wanted brighter (using white) or darker (using black).
Here is the result:

If you compare this to the original jpeg or the first (standard) RAW conversion, you’ll be able to see that some parts are lighter (her face, the gun, sections of the curtains), or darker (her right hand and knee, the camera-left rim of the tub, the shadow areas on the wall). The effect is pretty subtle, but important, at least to me.
You might be wondering why I would bother with the hassle of creating three separate RAW files and merging them together, and the answer is, normally I wouldn’t. Lightroom or Adobe RAW often do a perfectly fine job of tweaking the exposure to my liking without creating multiple versions of the same file, but if you want some highlight/shadow areas to be lighter and some to be darker, with a lower risk of damaging the image, being able to use masks along with various selection tools and brushes on layers with different exposure levels allows you a vastly greater level of control.
The next step involved zooming in and carefully examining the image closely (at actual size) for camera dust spots (there’s one on her knee), and other small bits (a couple of skin blemishes) that can be fixed relatively easy with photoshop’s spot-healing brush.
After that it was time to tackle the distortion. Go back and look at the any of the previous steps, and you’ll notice that lines that should be straight look curved. This is due to the lens. Nearly all lenses have at least some distortion, that can usually classified as either barrel distortion or pincushion distortion. Barrel distortion spreads out from the center of the photo like the panels of a wooden barrel, pushing everything (but it’s most noticeable with vertical and horizontal lines) outward, and is most commonly seen when using wide-angle lenses. You can also visualize this by imagining someone standing behind the photo and pushing against the center of it, making the photo appear to be convex. Pincushion distortion does the opposite, pulling everything inward, making the photo appear concave. It gets its name from the shape of a pincushion, because this kind of distortion curves the outer edges inward, like a pincushion. Since I was using a wide-angle lens in this case, I got barrel distortion.
To correct distortion these days, I use the “Lens Correction” tool in Lightroom, but if I remember correctly I used the filter in Photoshop with the same name. It’s worth noting that these days I would correct distortion in Lightroom before uploading different exposure conversions to Photoshop, but back when I edited this photo I wasn’t using Lightroom. Anyway, here’s the result:

Once the lines were (reasonably) straight, I moved on to trying to get rid of the color issues on Stacia’s left shoulder. In this shot I intentionally used different color temperatures (orange and greet) on my lights to set a mood, and while I liked the overall effect, I hated the distracting green bit between Stacia’s head and her left shoulder, so I tried to smooth everything out by (if memory serves: this was several years ago at the time of this writing) creating a duplicate layer (or probably layers) and using the cloning and patch tools, along with color and curves filters and masking. Here’s what I got:

Next I used a process called contrast masking, which increases shadow detail and flattens highlights. I use this sometimes when I want to lend a kind of surreal, three-dimensional feel to an image. This is a somewhat complicated process with many variations, although the way I generally do it basically involves using merging visible layers to create a new layer, setting that layer to either the “Soft Light” or “Overlay” filter, inverting the layer, desaturating it, blurring it (usually with the gaussian blur filter), reducing the opacity, and then repeating the process with different blur radii (radiuses), until I’m happy with the look. It’s very easy to overdo this process, which I’ve been guilty of many times in the past, but if done well, it creates a really distinctive, interesting look, with a lot of depth and pop. If you want to see contrast masking on steroids, do an internet search for Dave Hill and check out his advertising work, but note that this process is totally dependent on the lighting used on the image. Trying to do this with any old average photo isn’t going to get the same results.

So, having finished the contrast masking, I decided to add a high-pass filter to add some contrast and pop to the image. As time has passed, I find I use the high-pass filter in this way less often, because it also increases noise and desaturates the image, but it’s still worth checking out. The high-pass filter basically increases the contrast of edges in a photo, so at a low radius you can use it for sharpening, and if you expand the radius it can lend a kind of hyper-real look to your photos. I merged all visible layers into a new layer, set the blend mode to “Overlay,” desaturated it, and and added a high-pass layer. I don’t remember the radius I used, but anyway it’s going to be different for every photo, so you just have to experiment and see what works for you. At least for me, the result of doing this process tends to be over-the-top, and needs to be reduced in opacity. Here’s what I got before reducing the effect:

Too much, clearly. After reducing the opacity of the hi-pass layer, and merging it with the previous contrast mask layer (I reduced the opacity of this layer also), I got this:

After this, I added a minor curves adjustment, reduced the saturation slightly, and sharpened it, to arrive at the final version. You can move your cursor over the image to compare it to the original, unedited jpeg (note: unfortunately, if you’re on mobile or using certain browsers, this rollover effect may not work):
You’ve got to be pretty obsessed about photography to spend this much time and effort on just one photo. This level of commitment certainly isn’t for everyone, and is either impossible or at least overkill most of the time, even for working photographers, and often especially for working photographers. The average pro event shooter might shoot thousands of frames just on one gig and, after whittling them down to the best few hundred and optimizing them, simply could not afford to devote this much time to more than one or two of those shots, let alone all of them. He or she is too busy hustling to get clients. On the other hand, for a big-time commercial job, where the goal might be to get no more than a handful of final shots, but they have to be absolutely perfect, you can bet that the post-production work I did on this shot is nothing compared to what those guys are doing.
Looking back on this shot now, there are several things I would change. First of all, I might’ve gone in a different direction with the story of the image, because of what I (unexpectedly) got on the third real frame of the shoot: something about suicide as opposed to an external threat. Second (assuming that I didn’t go in that different direction), I would’ve removed that distracting metal thing hanging on the wall behind Stacia. Third, I would have tried to show her in the process of getting out of the tub. Fourth, I would’ve tried harder to find some way to get water actually flowing. I think it would’ve added something to the shot to see that whatever was happening outside the frame was urgent enough that she hadn’t yet bothered to turn the water off, as well as being visually interesting. Fifth, I wouldn’t have desaturated this is much I did, and made some adjustments to the filters I applied.
At some point I may go back and change some of these things. Probably not though. Everything may be clearer in hindsight, but overall, I’m still pretty pleased with how this turned out, all things considered. And as the saying goes, the journey is more important than the destination. Besides, it’s a lot more interesting to attack new projects than to repair old ones. Anyway, I wish you luck in your project and if you like what you’ve read here, I’ll talk to you in my next one!